About Me

My photo
Cardiff, Wales, United Kingdom
I am Ollie Elliott. I studied BA Computer Games Design and got a 2.1 with honours at Newport University. I'm from sunny Somerset. This is my blog. It's about different things. Go away.
Showing posts with label 3D modelling. Show all posts

Saturday, 13 October 2012

Spillin the beans (Part 2)

 Welcome back to Spillin the beans! This post won't be as in depth as the last, nor will it be about Spillins as he has been sent off for rigging by master animator Steven "Crane Style" Craner and so I haven't done any more work to him.
 Instead I've been doing various bits of environmental modelling and texturing so this is going to be about that. Hopefully there will be something of interest in here for you and if not it's always nice to document the work that I've done. Anyway...
Awwwwww here it goes.....
 Also we have a new Facebook page for the game (click here) and it needs your likeage! Anyway...
Awwww here it goes.....

Lever

 My first port of call was to model and texture the lever that appears throughout the game to open doors, gates etc. The model itself didn't take too long but the texture did take a few hours as it was the first thing I'd textured in a long time. I don't tend to keep my layout clean as I don't really see the point with this kind of model but with characters etc it's obviously better to make the most of space with the UV layout.
 Here's the texture map of the lever base, I was going to post the separate handle texture but it's even less interesting than this:
  

 And here's the model textured and in-engine (without lighting built, that's why it appears to be lighter than the rest of the environment):


 Hopefully it will stand up to being a recurring environment piece!

Chest & Graveyard Wall

 For the next two assets I've only needed to do the modelling so far so no texturing here.
First up is the treasure chest. It's not remarkably different from the treasure chest you imagined when you read the previous sentence but I tried to jazz it up a bit with handles and pointy bits so hopefully it's unique enough to fit into our world. Here's a render of the model: 


 Second is the wall and gateway that separates the regular citizens' graveyard from the VIP tombs (I think). The concave side (citizens) will be stone bricks and the convex side (VIP) is built up from large rocks and boulders. Here's the render:


 Will possibly be texturing these next week so look out for them.

Flower Bushes

 Here's the one you've all been waiting for. Don't pretend you haven't. I know you have. Here's the flower bushes (I textured, Pete modelled):

 And here's the texture map which I think looks pretty funky:


 Well that's all for Part 2. Hope you enjoyed, more will be coming soon. Please like the Facebook page if you haven't already and help support and promote the game!
Bye.

Tuesday, 21 August 2012

Spillin the beans (Part 1)

 It's been a quite a while since my last post. I've got a job now and have been working on stuff in the rest of my free time so that's why! But here I am again with a big update specifically about my work on Project Steel, which has since become 'The Seeker'.
So yeah this post is going to be a recap on where I was up to in the design process of the character Spillins last time and, from there, cover his progression into a 3D model in-engine. There will be some ground I've covered before but hopefully enough new stuff to be interesting. Aww here it goes...

Character Design


 With a pair of sketches of Spillins that Pete drew last year as a starting point I began work on the character design concept drawing. Using reference points such as famous historical explorers, american mountain men, and Yoda, the drawing took shape and finally ended up as the image you can see above.

 While designing Spillins I made a conscious effort to make him as recognisable from a distance as possible. As he is such a mysterious character and will occasionally appear at long distances unannounced it is important that his design catches the player's eye so that they don't miss him. The two main factors I took into account were his silhouette and his colour palette. 
Giving him a large rucksack, bulky figure, and bald head combined with a red coat with white fur (based on an image of the aforementioned mountain men I found) will hopefully mean he stands out against both the white mountains and the dark green forest settings of the game. 

Orthographic Drawing


 With the concept drawing complete the next step was to create an orthographic drawing of the character to aid the transition into a 3D model.
 I suffer from the problem of not being able to draw the same thing twice so, as you can imagine, I'm not a massive fan of this type of drawing. Luckily however I knew before I started that I would be modelling Spillins so I didn't have to go into a serious amount of detail as I could visualise the missing pieces in my head, having come up with the character's design myself. Had I had to pass the drawing on to someone else for modelling (or if this is the case in the future) I would have gone into a lot more detail to make sure they understood exactly how he is meant to look.
 Having said all that, the orthographics were fairly painless to draw and I had a good image in my head of how Spillins was going to look as a 3D model.

3D Modelling

 I was so glad to get into the task of modelling Spillins. As much as I'm satisfied by finishing a drawing, it doesn't come close to modelling, which I find constantly rewarding.
 There's little to say about modelling the main bulk of the character's body, arms, and legs as it was so trouble-free and quickly finished. The video below shows the body at an almost finished stage with a placeholder head:


 Once the main body was finished I moved on to Spillins' hands, which turned out to be the most frustrating but ultimately rewarding part of the model. Although the topology isn't great I'm incredibly happy with the shaping of the hand:


 Next was probably the most important part of the model, the head... The following image shows the head throughout the process growing from a random bunch of polygons into something more recognisable:


 And here's the head at this point on a partially accessorised body (rendered in Maya):


 After quite a few hours of developing and tweaking the head is complete. Following that more accessories are added and the model is complete and reading for engine testing:


 And again with the wireframe visible (don't forget to view the pictures in full size!):


 I'm pretty pleased with the model's poly count (weighing in at just under 4000 faces) but obviously still have much to learn when it comes to low-poly game modelling (and modelling in general of course). Since finishing the model I've found some great topology pictures of Assassin's Creed Brotherhood characters which have insanely low poly counts and which I will be using very closely as reference points for future character modelling. 

 To wrap up this part of the development of Spillins I give you him in-engine (UDK) with a rather jazzy sandstone texture (unfortunately not two-sided as his bag strap is invisible):


 I hope you agree that he's looking good and hope that this post offers a bit more insight than usual haha! Next time I will hopefully have the model textured and possibly rigged, but that's all for now.
BYE

Friday, 29 June 2012

June 2012 dump

 After the tidal wave of posts in May I've been relatively quiet this month. I have done some stuff though and here it is...

 I've started working on the orthographic drawings for the Project Steel characters and this is the first completed one, Spillins. Normally I'd tidy up the drawing with clean lines before signing them off but we've decided that I will be modelling him so there's no real need as I have a good enough picture of what he looks like:


 At the very end of last month I also released episode 2 of my lego-style minecraft instruction videos so here it is:


 Finally I have set up a DeviantArt page (http://enormousblogodile.deviantart.com/) to post and promote stuff. You can get to it via the other sites/contact list on the right of the blog.
bye

Monday, 25 April 2011

Skyway update 25th April 2011 EXTRA!

 We've been doing a lot of stuff in UDK over the past few weeks, working out some of the different gameplay      elements such as moving water cubes, putting in a skybox, checkpoints etc. It's all very important stuff but unfortunately there's not much to show of it, but here's a screenshot of the skybox in engine. It looks really close as there are no distance markers and the sun is slightly too big:


 But anyway here's some more interesting stuff. I finished rigging and weight painting Oscar. It's not perfect but it needs to be out of the way so it'll do for now. Here he is posed:


 We've also been working on prop assets to decorate the pier and it's surroundings. Here are some potted bushes:


 A lovely welsh daffodil:


 A life ring (not finished):


 and a pair of beach umbrellas:


 Not much else for Skyway really, any other stuff is on our indiedb and/or facebook page so check them out :)
 In other news I've started trying to model Simon and Lewis from the Yogscast as I'm thinking about animating a few short segments from the Yogpod in 3D as they attract a lot of attention on Youtube and could be good promotion for EB. Also it's all good practice for modelling, facial rigging, character design and other stuff.
 So here's Simon's head so far:


 The new Doctor Who started on Saturday and was great. I'm not sure if everyone picked up on the Easter Island joke but I thought it was very funny. Really like Matt Smith's Doctor.
Bye

Saturday, 26 March 2011

3D Glasses for Tom

 Tom asked me to model some 3D glasses in Maya for his advertising FMP website. Here's the model with the different designs (created and textured by Tom):


 The arms can fold in as well but you can't see that here. It didn't take too long to model but I did smooth it a lot which, it turns out, makes unwrapping UVs a fair bit more complicated. Tom's happy with them though and he's paying me with vodka so it's all good.

 Tom's behance: http://www.behance.net/TomGriffiths

BYE

Friday, 18 March 2011

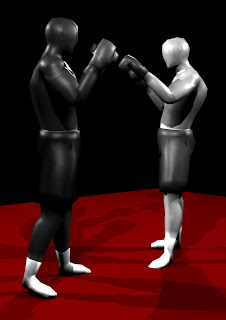
I've been modelling boxers for Paul...

 Yes that's right, I've been making a 3D model of a boxer for Paul and his final project.
It's fairly low poly I think (just over 1100 faces). I made it following a great tutorial on body modelling on Youtube and it took me two sittings which I'm pretty pleased with.
 I've also textured them with two colour schemes (a black guy with black shorts and a white guy with blue) and done a basic rig and weight painting.

 Anyway here are some shots of the boxers posed and with greyscale variants of the original textures:


 I'm pleased with them and hopefully they'll help Paul with his work.
Bye. 

Tuesday, 15 March 2011

Skyway Update 15th March 2011

 So basically since last time we have been building our characters. There are four characters in our demo and four of us so we modelled one each. I took Oscar, Rich took Mr. Docherty, Ollie took Hooch and Ben was given Mrs. Docherty.
 Here's the finished model of Oscar with his texture applied: 


 And here are the UV and Diffuse maps, I'm pretty pleased with the unwrapping, especially on the head, but there were a few mistakes I noticed on the way:


 With our style the character's are mainly block colours but I added a painted hair texture and subtle cotton and denim textures on the clothes to make it a bit more interesting.

 Next we started rigging our characters following some amazing tutorials and below you can see the rigged Oscar with its controls. Just need to paint the weights and do some blend deformers for facial animation:


 Also we've been making a bit more progress with getting things into UDK. Here's Oscar (with collision) and a non-opaque water cube that you can swim through:  


 You can see the other characters at our indiedb profile as well as other stuff.

That's all for now. BYE.

Wednesday, 9 February 2011

Skyway Update 9th February 2011

 So last week we finished our pre-production paper work and handed it in and yesterday Ben and Ollie did the  presentation on where we are now with the project. It all went pretty well.

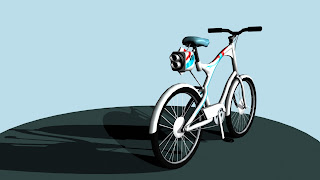
 Here's what I've been up to over the last couple of weeks, Oscar's Rocketcycle.
DON'T FORGET TO CLICK THUMBNAILS FOR THE FULL SIZE IMAGES.
This is the final colour design for Oscar's bike (I think I posted the first colour variants in my last update):
 Here are the texture maps I made for the 3D Maya model. Each one's real size is 2048 x 2048. 
On the left is the original UV map. I had never really unwrapped a model properly so had to learn as I was doing it but, as the model and colour scheme are fairly simple, I was able to use planar mapping for almost all the parts. The rocket was the only part that needed more than one side of mapping.
 The middle is the diffuse (I think) map (the black and white wireframes are transparent), hopefully you can start to what the parts are a bit more easily here.
 Finally is the specular map, which I only recently found out the purpose of. It is basically a grey-scale map that determines the amount that parts reflect light with black being not at all and white being completely and everything in between.     


 This is the 3D model with the UV map applied, roughly showing the wireframe although for some reason some areas seem to have a lot more lines than they should... The model has around 3500 faces (not sure if that equates exactly to polys) which I am pretty pleased with:


 The model with diffuse and specular maps added. Essentially the finished model:


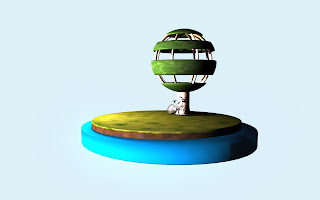
 Here it is in a scene I made (textured by Ollie L) as a kind of mock-up of Skyway's title screen that we used in our presentation:


 That's it for now. Hopefully a lot more actual stuff coming soon as the project gets properly going.
And for fuck sake join our Facebook group: http://www.facebook.com/pages/Skyway/161571303886228?ref=ts

BYE

Friday, 17 December 2010

Craig's Direct Line Viral Phone

 Tuesday and Thursday this week I have been doing some 3D modelling for my mate Craig. He is doing Advertising Design and making a Direct Line Youtube viral ad for a project.
 I modelled the iconic red phone while Sooth Efricon Craig modelled the more recent red mouse (with some help from me :D) and is going to do the animation.
 Anyway here are some renders of the model. It's not very economical with polygons but otherwise I'm very pleased with it:


 Let me know what you think. OK. Thanks. bye